Fuel Pressure and flow (Petrol only)
Toyota 4A-FE test engine on workbench
The fuel injector is only a nozzle and a valve: the power to inject the fuel comes from a pump or a pressure container farther back in the fuel supply, this and the fuel pressure regulator determine the fuel pressure we will now be measuring.
I was be careful around raw fuel. It could catch fire! I Used appropriate safety precautions. Kept sparks, flame, your body and your clothing away from raw fuel. I found where your fire extinguishers are and used them if necessary.
I Locate the two closest fire extinguishers. (If you have to use it remember to pull the pin, squeeze the handle, and spray at the base of the flame.)
they are: located just inside shed 01 and through the shed 02 near the side door.
I looked up the Fuel Pressure specifications for the Toyota I’m testing:
265 to 304 Kpa or 38 to 44psi (2.7- 3 Kgf/cm2)
I Used eye protection. Optional: Relieve fuel pressure before installing pressure gauge. Or there will be some fuel that sprays at you as you attach the gauge. You can relieve pressure by several methods:
1) To relieve the fuel pressure. Make sure you have a rag to catch the fuel, start the engine.
2) Remove fuel pump (circuit opening) relay or fuse and run the engine until it stops, then crank to check that the engine doesn’t start
3) Use a vacuum gauge on the pressure regulator to lower fuel pressure, or
4) Open a fuel line at some pressure point and catch the fuel in a rag beware there may be lots of fuel.
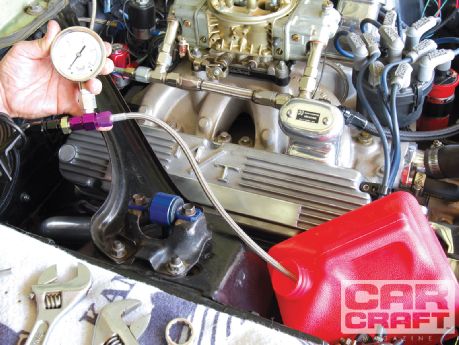
But since we have a test engine on the workbench with fuel pressure gauges connected already, the above was not needed.
With the Attached fuel pressure gauge. I will use the PSI scale on the gauge.
Briefly turn key on or start vehicle, then turn it off. Check for fuel leaks.
There are no leaks.
If there are leaks you must correct them and retest before continuing.
Measure the fuel pressure with the key on, engine off.
Record it here: 35psi
1. Idling: Measure the fuel pressure with the engine idling. Watch the pressure for a couple of minutes.
Record pressure here: 38 to 39 psi
2. Maximum: With the engine idling, use the special tool (pliers and a rag) to clamp the fuel return line. This was only done for a short period of time.
Record pressure here: 65 psi
3. WOT: With the engine idling, disconnect and plug the vacuum line going to the fuel pressure regulator.
Record pressure here: 48 psi
4. Residual: Turn off the engine, and watch the fuel pressure for five minutes.
Record your residual or rest pressure here 34 psi
 |
| Measuring Flow |
5. Replace vacuum lines. Carefully remove the fuel pressure gauge (beware of fuel spraying into eyes, avoid sparks, etc.) Turn engine key on and off, check for leaks. Start engine, check for leaks. No leaks.
Replace cap over fuel pressure test port. Done.
Make sure the vehicle is safe and runs fine when done.
6. It is important to know a vehicle fuel pressure/flow for your engine to have the ability to generate power, proper fuel pressure is necessary. An underpowered engine results from fuel pressure that’s too low.
7. The symptoms a vehicle would give with each case
Low fuel pressure
Underpowered engine because of a lean mixture/lack of fuel being injected ( lambda is greater than 1)
Low fuel flow
Underpowered engine giving a lack of acceleration because of a lean mixture/ lack of fuel being supplied to injectors (lambda is greater than one)
 Sard adjustable Fuel regulators utilizes an extra light weight diaphram assemply that provides excellent pulsation dampening; to dampen the pressure spikes caused by high flow fuel pumps and cycling injectors (especially non-factory high flow fuel injectors). Sard Fuel pressure regulators (pictured right) are designed to provide the correct fuel pressure for any high performance fuel injected vehicle. The type R is designed for high horsepower naturally aspirated fuel injected and turbo charged engines. Due to the boost compensation design, it can provide more fuel under high turbo boost conditions. Construction is of high quality as parts are machined from billet aluminum. Pressure adjustment is made easy by turning the built - in 360 degree nut.
When installing higher capacity fuel injectors, the fuel pressure needs to be adjusted to accomodate the new injectors. In addition to allowing tuning to accomodate higher capacity fuel injectors, the SARD Adjustable Fuel Pressure Regulator can be used with stock fuel injectors to increase fuel delivery by increasing fuel pressure.
Faulty fuel pressure regulator
If the fuel pressure regulator is blocked the pressure will be high (about 80psi the mixture will be rich and the engine will, have bad emissions and worse fuel economy.
References
http://hubpages.com/hub/Ensure-A-Good-Reading-for-Your-Vehicle-With-A-Fuel-Pressure-Gauge
http://www.shhproshopbrunei.com/2010/08/sard-fuel-regulator.html
 This is a crude test to see if they are being actuated and are opening.
http://www.shhproshopbrunei.com/2010/08/sard-fuel-regulator.html
Petrol Fuel Injector Testing
Make Toyota Model Corolla 4A Year 2001
1. Listen to the injectors as the engine is idling. Use stethoscope, vacuum line or long screwdriver. They sound like a sharp tap, not a dull thud or nothing.
I can get to all the injectors, this test was interesting and the injectors are good.
2. Check voltage to the injectors when idling or Key On. This makes sure you have battery voltage to the injectors so they can work.
Record battery voltage: 14.4V
Record voltage at each injector you can get to by back probing.
Cyl #1 | Cyl #2 | Cyl #3 | Cyl #4 | |
14.12 | 14.02 | 14.03 | 14.08 | Volts |
3. With engine idling, watch injector firing by using an LED tester or test. Hook up test light and connect tip to pin that has back probed connector to injector -. As the injector was grounded by the ECM to fire, the test light was also grounded to fire, and flashed. I noticed the engine speed momentarily decreased.
Cyl #1 | Cyl #2 | Cyl #3 | Cyl #4 |
YEP | YEP | YEP | YEP |
4. With engine idling, watch the injector firing by using a multi-meter set to read % (duty cycle). Recorded below are the readings for each cylinder at idle.
Cyl #1 | Cyl #2 | Cyl #3 | Cyl #4 | |
21 | 21 | 21 | 20 | Duty cycle % |
5. With the multi-meter still set to read % (duty cycle), I accelerated the engine with short, fast throttle openings and note in the boxes below the maximum % reading you can get on the multi-meter: note the RPM.
Cyl #1 | Cyl #2 | Cyl #3 | Cyl #4 | |
35 | 35 | 35 | 32 | Duty cycle % |
6. Set the multi-meter to read Hz, and with the engine idling, record the readings for each cylinder in the boxes below:
Cyl #1 | Cyl #2 | Cyl #3 | Cyl #4 | |
6.0 | 5.9 | 6 | 6 | Hz |
7. With the multi-meter still set to read Hz, increase the engine RPM (don’t damage the engine), and watch how the Hz changes. Record your highest reading in the boxes below:
8.
Cyl #1 | Cyl #2 | Cyl #3 | Cyl #4 | |
11.7 | 17 | 21 | 20 | Hz |
Using this formula I calculated the pulse width of each injector both at idle and when the engine is revved up.
“Pulse width ms = (% Duty cycle/100)/Frequency”
My simplified calculations;
At Idle
Pulse width ms = (21/6.0) = 0.015 ms
At Increased RPM
“Pulse width ms = (35/20) = 0.0175 ms
Cyl #1 | Cyl #2 | Cyl #3 | Cyl #4 | |||
3.5 | 3.5 | 3.5 | 3.3 | Calculated Time at Idle(ms) | ||
Cyl #1 | Cyl #2 | Cyl #3 | Cyl #4 | |||
2.99 | 2.05 | 1.66 | 1.6 | Calculated Time when revved | ||
In conclusion this is an acceptable way to test injectors because it takes every aspect into consideration. The only variance was generated from human error when I blipped the throttle and in the formula we were given
As 20% * 100 = 20 but we were given 20% = 0.02 / 100 = 0.0002. Not to worry. As I have changed my formula to duty cycle (numbers / Hz).